Long post.
Adding a push button
- Add a button in O-S-C (right click / + Add widget / Basics / button).
With the button selected, in the inspector, go to button/mode. Choosepush. - Depending on the complexity of what you want the button to do, you will use either the scripting property, or the osc property (located in the inspector).
Both properties allow you to send midi/osc messages.

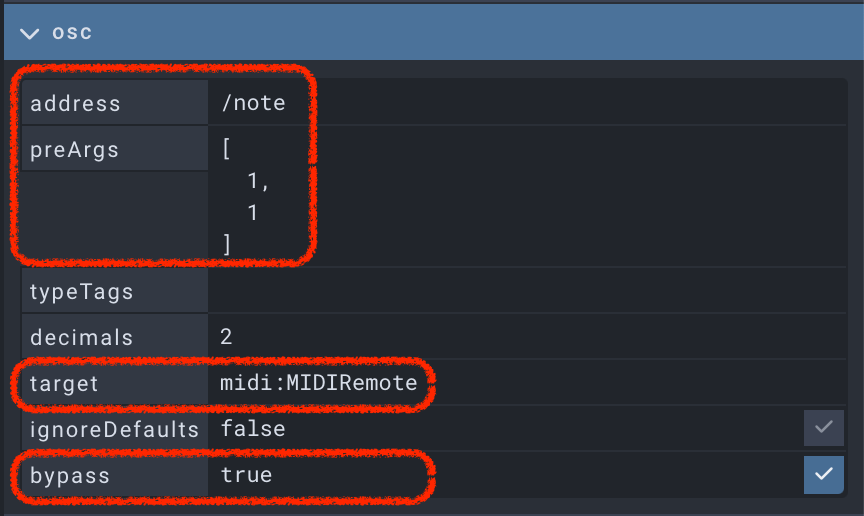
Configuring the button to send a MIDI message (ch. 1, note 1, velocity 127)
Using the osc property
Set the properties as in the following screenshot.
Note: you need to replace "MIDIRemote" with the name of your port. Also, you need to make sure that O-S-C knows about the port. In the configuration form of O-S-C, in the midi field/box you need to enter:
MIDIRemote:MIDIRemote,MIDIRemote
(if your port is named "MIDIRemote")
Using the scripting property
With the button selected, in the inspector, go to scripting. Then, inside the onValue box, paste the following code. Don't forget to replace "MIDIRemote" with your port name.
if (value === 1) {
  send("midi:MIDIRemote", "/note", 1, 1, 127)
}
When you press the button, its value changes to 1, and when you release it, to 0. If I wouldn't have included the if statement in the script, the MIDI message would've been sent twice (at button press and at button release).
The onValue box should look like this:


So this is the first step (to create the buttons in O-S-C).
The second step is telling Cubase to which MIDI messages should it respond (continue to read).
I couldn't find the "Hide All Tracks" command, so I've created a PLE (Project Logical Editor) preset (to use in the instructions below). I named it hAllTracksPLE.
Here I go with the instructions:

There are two ways in which you can link a command in Cubase to a button that you created in O-S-C: (A) through Generic Remote or (B) through MIDI Remote.
A. Linking commands to MIDI messages through Generic Remote
˚˚˚˚˚˚˚˚˚˚˚˚˚˚˚˚˚˚˚˚˚˚˚˚˚˚˚˚˚˚˚˚˚˚˚˚˚˚˚˚˚˚˚˚˚˚˚˚˚˚˚˚˚˚˚˚˚˚˚˚˚˚˚˚˚˚˚˚˚˚˚˚˚˚˚˚˚˚˚˚˚˚˚˚˚˚˚
(A.1) Make sure no other entries are present in the Generic Remote.

_
(A.2) Set the input port of the Generic Remote to the port you created with loopMIDI (the port that you'll be using for custom made O-S-C buttons).
Note: I don't recommend that you also set the output port. Leave that to "Not Connected".
If though, you're a fan of headaches, you can ignore me. Who am I to stop you from having headaches?
_
(A.3) Notice that there are two "Add" buttons (in Generic Remote). Press the first one in order to create an entry. Create as many entries as need. If you have 5 buttons in O-S-C, create 5 entries.
The rules to keep in mind when linking MIDI messages (top list) to Cubase commands (bottom list) are as follows:
∆ Make sure that you don't name several entries the same. Each entry should have its own name. Doing otherwise, would make you lose the entries you created upon Cubase restart.
∆ Keep track of what MIDI messages you've used. This will take you further away from the headache neighborhood (assuming you don't want to live there).

When you edit the buttons/widgets in O-S-C, you can consult this table and know right off the bat what MIDI messages you can use. This would be rule no. 3:
∆ Always create the buttons in O-S-C first!
_
(A.4) Do the following:
◊ Select the first entry in the top area/box/section
◊ Activate the "Learn" option
◊ Press the buttons in O-S-C one by one (notice how each entry gets automatically configured with each press)
◊ Deactivate the "Learn" option (very important! you're not a fan of headaches, are you?)
◊ Name the entries (if you haven't already done so)
_
(A.5) In the second entry list you need to navigate to the commands that you need them assigned to O-S-C buttons. Notice that, similar to the first entry list, the second entry list also has multiple columns. You use these columns to navigate to different things that you need to control in Cubase.
The columns are named:
[Control Name] __ [Device] __ [Channel/Category] __ [Value/Action] __ [Flags]


_
That's it..
B. Linking commands to MIDI messages through MIDI Remote
˚˚˚˚˚˚˚˚˚˚˚˚˚˚˚˚˚˚˚˚˚˚˚˚˚˚˚˚˚˚˚˚˚˚˚˚˚˚˚˚˚˚˚˚˚˚˚˚˚˚˚˚˚˚˚˚˚˚˚˚˚˚˚˚˚˚˚˚˚˚˚˚˚˚˚˚˚˚˚˚˚˚˚˚˚˚˚
(B.1) Open the lower zone.
![]()
(B.2) Click on MIDI Remote

(B.3) Add a new surface.

(B.4) In the screen that opened fill the properties according to the following, then press "Create MIDI Controller Surface":
Vendor > + Add Vendor > Batman Industry (or whataver...)
Model > Batmobile (or whatever...)
Script Creator > Bruce (or your nickname...)
Input port > a port you created (with loopMIDI) for MIDI Remote
Output port > same port as above

(B.5) Select "button", then press the O-S-C button (or buttons).


(B.6) Open the mapping assistant.

(B.7) When the mapping assistant is open, press the O-S-C button that you'd like assign to a Cubase command. Pressing the O-S-C button wil select the corresponding button in the Cubase surface.
(B.8) Now search for the wanted command/function in the right zone of the window. If the right zone is not open, click the button situated in the top right corner of the window. When you find it, double click it.
That's it.